Sunday, December 28, 2014

Giveaway Winner!

Thanks all of you for entering the giveaway! Your suggestions were all great and I will do my best to incorporate them in the coming year.

Now, the reason you actually clicked on this post:

To make the giveaway fair for everyone, I put the names in the order of the Blogger timestamps and used a random number generator to determine the winner. And since the generator chose the number 2, the winner is Lulu! Congratulations! Please email me within 48 hours to claim your prize.

Thank you all for entering the giveaway, and for all your support. I'm getting ready for tutorials for next year, and can't wait to see you all on January 1 and share photos from the Doll of the Year release at the American Girl Place!

Tuesday, December 16, 2014

Anniversary/Thank You Giveaway!

At last, here's the promised giveaway. I wanted to make it a little more special since I'm tremendously grateful for not only your help with the Doll Wardrobe FDC, but for being such an incredible group of readers throughout two years of blogging, so rather than just illustrating the outfit I made for the FDC, I put together a sheet of eight Ever After High characters to send to one lucky winner. Apologies in advance for the photo quality; the weather has been terrible.

Clockwise from right: C. A. Cupid, Madeleine Hatter, Raven Queen, Apple White, Cedar Wood, Ashlynn Ella, Blondie Lockes, Briar Beauty

I'm debating whether or not to color these in or leave them as is. What do you think?

Drawing these took about twelve hours divided between two and a half days, but I'm pretty happy with how these came out and I hope you are too. Some of my favorite details:

Blondie Lockes's hair was a pain and a half but since Goldilocks is known for her hair it seemed worth the extra effort.


I've wanted to try making Cedar Wood for ages, and she was a lot of fun to draw. I was conflicted between making her socks accurate to the webisodes or the doll, so I tried to compromise, but if you have a specific preference please let me know.


By far my favorite part of making these dolls was creating the faces. Ashlynn Ella's turned out particularly well:


How to enter the giveaway:

1. Comment below with a suggestion for improvement for next year. How can I make Paper Doll World a better blog? What posts would you like to see? Is there anything I should stop or continue?

2. For one extra entry, share this giveaway on your own site or social media. Leave a comment with a link so I can count the entry.

3. Following Paper Doll World is optional, but if you're a follower your first entry counts double. 

If you win, please email me within 48 hours at the email address in the sidebar to claim your prize. The giveaway ends on Sunday, December 28, at 12:00 pm EST. 

Good luck, and thanks again for all your support!

Tuesday, December 9, 2014

2

This morning I realized that it's been two years since I started Paper Doll World. I'm not really good at marking anniversaries and I'm crazy busy since the semester ends next week (!!!), but it was the motivation I need to get back to blogging since I've maintained radio silence for the past month. Nostalgia and displays of emotion aren't really my thing either, but to me this is a milestone and I intend to mark it with a rare bit of sentiment.

This past year has been really hard physically and emotionally in my off-screen life, so blogging and paper doll creating have taken second priority. Yet the fact that you readers have stayed with me this whole time and put up with all my absence is something special for which I'm profoundly grateful. I remember the struggle to get five subscribers in January 2013, and now Paper Doll World has just hit 40. To say I'm floored, honored, and humbled is an understatement. Even beyond the numbers, the comments you've left have been so kind and supportive, and show me that I'm not just shouting into a void - that there are other people who find this simple art form as fun and captivating as I do. Thank you all so, so much. 

What better way to end this than by answering the Grateful Blog Award prompt? Thanks to Blaire and Cora for being so gracious and nominating me. I'm so behind on these things that I don't know who has and hasn't been nominated yet, so if you haven't and are interested, then consider yourself nominated. 

I'm thankful for:

1. My family, whom I adore beyond everything.
2. My father in particular, who has been my number one supporter from the beginning.
3. My friends, both in person and online, whose support and encouragement mean the world to me.
4. All of you wonderful readers, without whom Paper Doll World wouldn't exist.
5. My art teachers, whose instruction in drawing and craftsmanship has been indispensable.
6. Emily of Toy Box Philosopher for giving me the incredible opportunity to share my review of Ophelia. 
7. Bella and Lulu for all the opportunities they've given me to share tutorials for the Doll Mag.
8. Penny, Nora, and Maple, for Isla and all the subsequent joy and creativity she's brought me.  
9. Nethilia, whose sharp and hilarious posts have made me more conscientious and sensitive as a person, blogger, and paper doll designer. 
10. The ability to do what makes me happy - to share my love for drawing and find other people who share that love.

Thanks for seeing Paper Doll World through a second year! Here's to an even better and more productive third. 

Friday, October 31, 2014

Thank You! (+ Giveaway)

Sorry for the radio silence lately - what with my workload and some difficult things going on in my personal life, I've barely had time to sleep, let alone update here. I'm still trying to work out a proper posting schedule that I can manage, but I'm going to try to be a little more present.

Anyways, the main reason for this post is to say a massive "thank you" to all of you who voted for me in the Doll Wardrobe Summer FDC. That project was, to use the hackneyed phrase, an incredible labor of love, and all your support means the world to me. I just found out yesterday that I won in the newbie category, and as a thank you I'm going to have a giveaway! I'm still working out the details, so if there's any prize or idea for the giveaway that you'd like to suggest, please let me know.  I typically make paper doll PDFs for giveaway prizes since there's no shipping involved and all the winner needs to provide is an email address rather than a shipping address, but if you want to mix it up a little I was thinking about making something crafty for a giveaway prize. Again, the details are uncertain at this point, so if you can think of something that would be fun yet not overly expensive (while I dislike talking about finances on the internet and I would really love to give away an extravagant prize because you guys are awesome, the fact is that I'm a student on a budget) please share it in the comments. 

Lastly, I just realized that I never put up the second half of the Cerise Wolf tutorial. I'll put that up soon too - sorry about that!

Sunday, September 7, 2014

Quick Post: Please Help

Hi everyone - this is just a quick drive-by post, though I promise that the second half of the Cerise Wolf tutorial will be up on Tuesday. (I had a lot of fun making it and am thinking about expanding it into a EAH doll tutorial series, so if you're interested in that, please let me know!) 

In the meantime, it would be wonderful if you could just take a few seconds to vote for me in the Doll Wardrobe Fashion Design contest. I spent so much time and energy putting that entry together (one of the reasons that I didn't post much this summer), and your support means a lot to me. And the standard deal applies: if I win, then I'll do a giveaway, so everyone benefits. Just click the picture below!


See you on Tuesday!

Tuesday, September 2, 2014

Make Your Own Cerise Wolf (Part 1)

It's been a whirlwind few weeks, but I'm finally back with the Cerise Wolf tutorial I promised you. Cerise has never been my favorite Ever After High character, but the Cerise Wolf doll design is pretty cool, and if you didn't get a chance to grab one at SDCC, here's your chance to make your own!

I'm going to split this tutorial in two parts because my internet connection is really bad (it's limited by week, and I can't upload all the pictures at once without burning out all this week's allotment). The first part will focus on creating the doll, and the next will show you how to create her costume.


As usual, the first step is to sketch out the doll's outline and facial features. 


Use purple and gray colored pencils to draw in her eyeshadow. (Sorry for the bad photo quality in these - I can't edit them without blowing out my internet access, but I'll fix them as soon as I can. Hopefully you can get a better idea of her face from the images in the previous post).


Use tan colored pencils to draw in her skin tone and brows, and use pink for her blush. I added some shading to her face and body to make her look more dimensional.


Color her eyes and lips with marker. My marker tip was too large to let me draw in fangs, so I left them off, but you can always add them after taping the doll by drawing them on with a pin tip dipped in white paint. 


Cut her out and tape her up, and you have your own Cerise Wolf! If you're not satisfied with how she looks, you can very lightly add color and blend it with your fingertip to achieve the shade you want. 


Cerise has white hair with dark brown/black stripes. To add shadow to make it look dimensional, shade her hair with a light gray colored pencil. The doll has blunt cut bangs but I don't like the way they look on my dolls so I made some sideswept bangs instead.

That's it for the first part of the Cerise Wolf tutorial. Check back soon for the rest! Hope you enjoy it, and if you make your own please share the photos - I always love to see what you create.


Sunday, August 17, 2014

Miscellanea

As the title indicates, this is yet another bits and pieces post. Things are a little crazy over here, since I'm packing up to move on Friday. Please pardon the metaphorical dust!

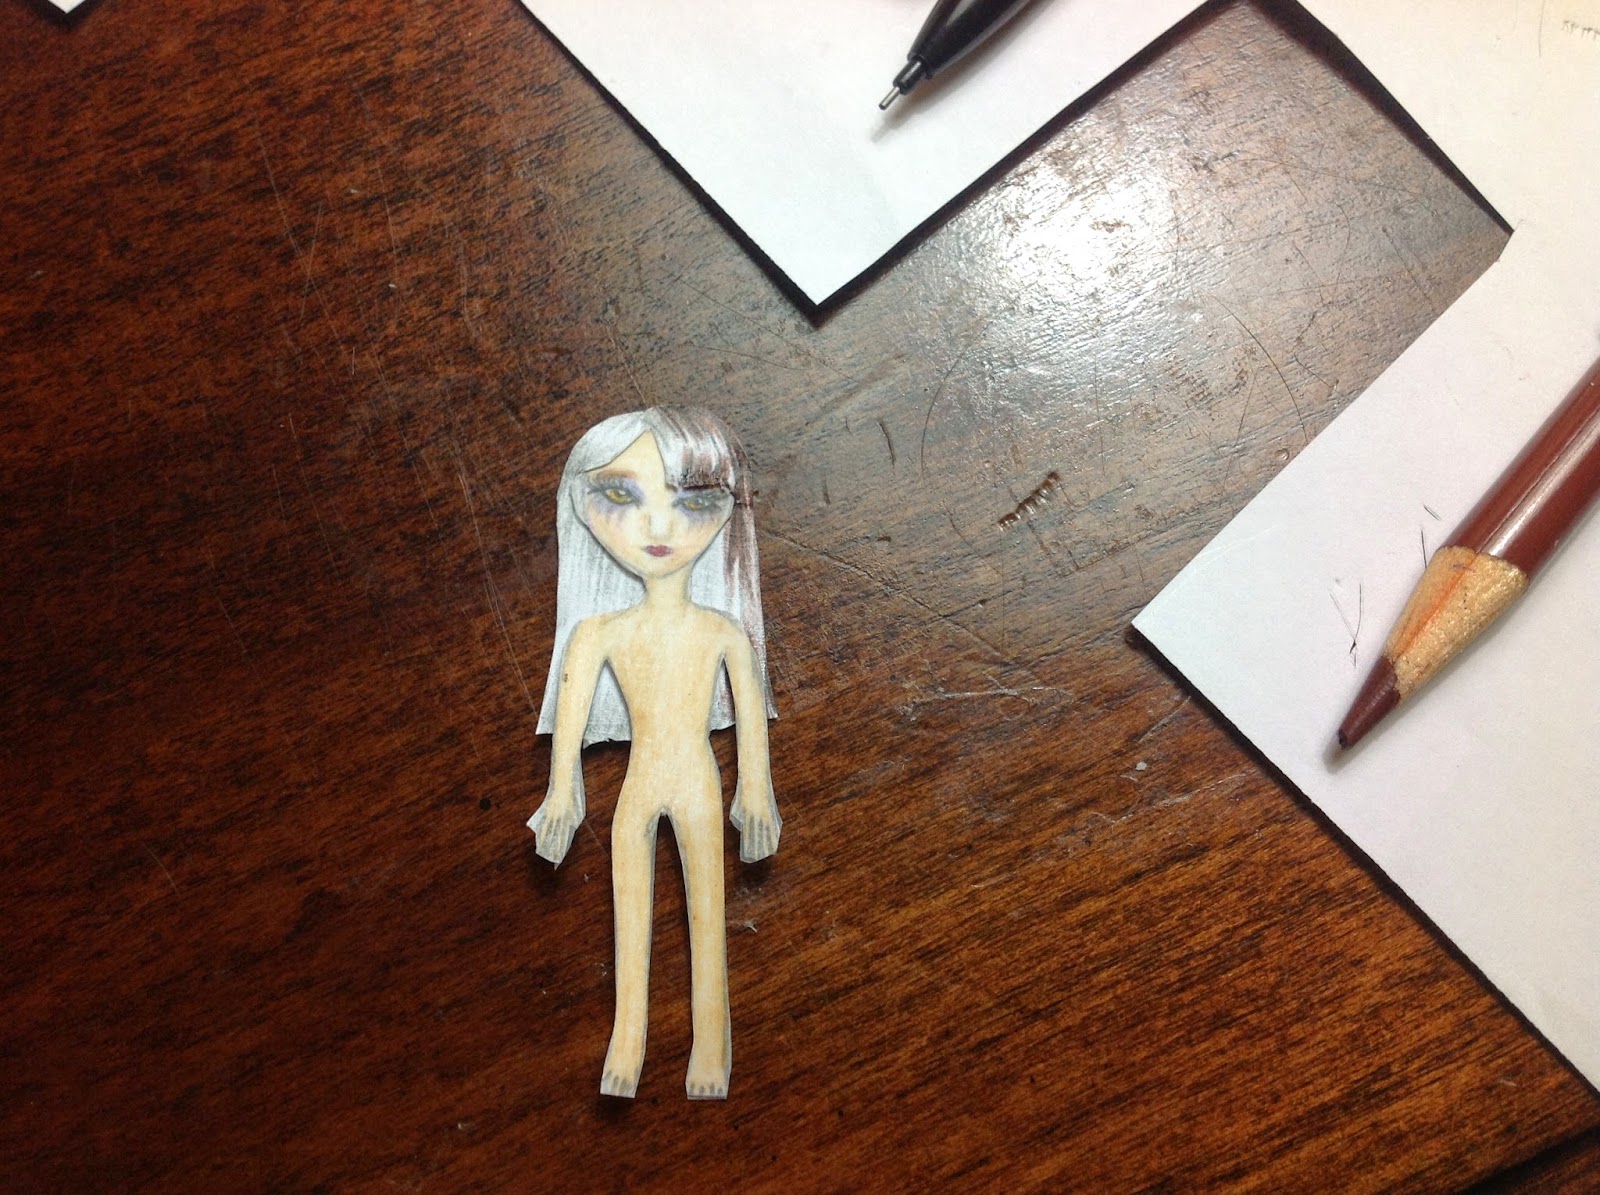
1. It's been forever since I did a Sunday photo shoot, and almost as long since I featured a paper doll! This one solves both problems by showing off my latest creation, Cerise Wolf.


I took these photos when on vacation with my family. We went camping, and the woods seemed the perfect place to showcase Cerise's wolf side. 


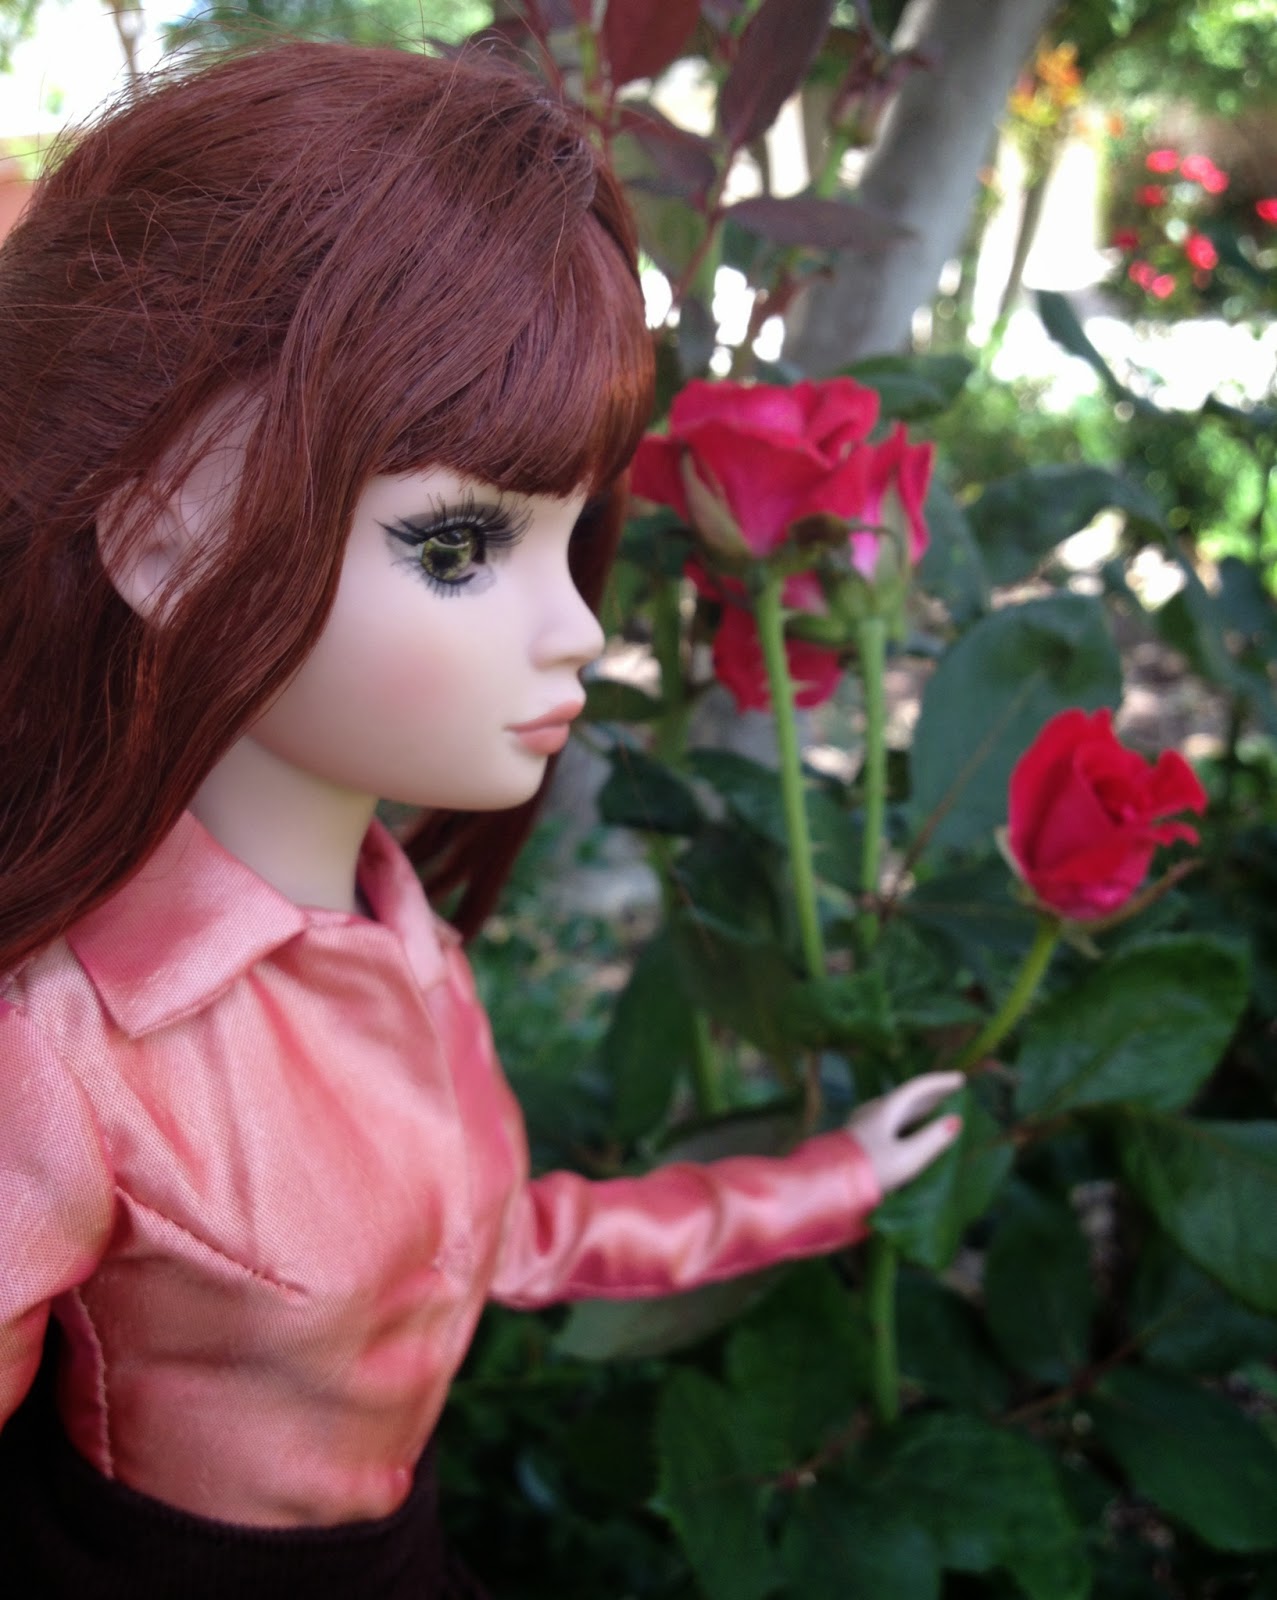
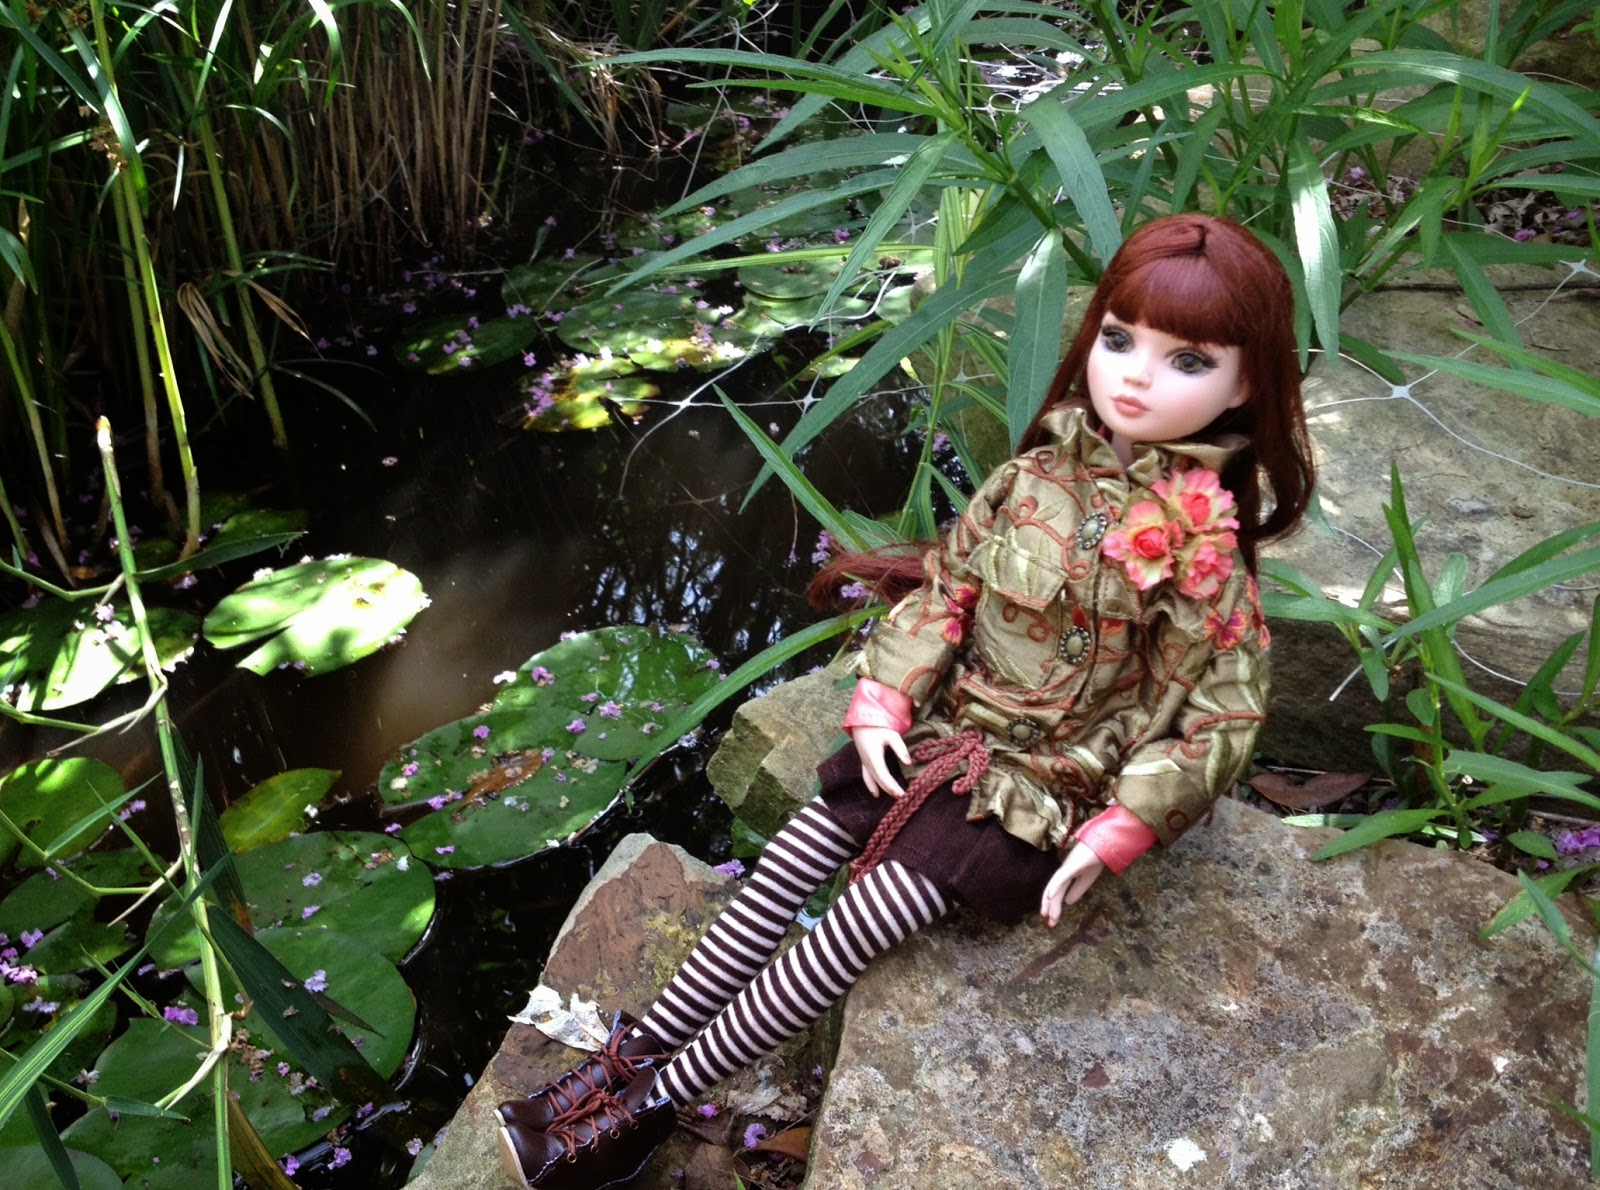
As you can probably tell, these photos weren't actually taken in the woods - I love photographing my dolls, but not enough to get poison ivy and spider bites. So I compromised by posing her on a wooden ledge. Her cape, when folded out, functioned so well as a stand that she barely needed tape to keep her posed. 


I'm really pleased with how she came out - to me she's more beautiful than the actual Cerise Wolf - but I'm also thrilled with how the pictures turned out too. These were all taken with a cell phone camera, and yet I managed to get a nice blurry woods background without the use of fancy lenses and settings. (I say this not to boast but to encourage you - Paper Doll World is all about achieving the results you want on a budget, and if I can do it, of course you can.)


If you liked these photos, stay tuned because I have a tutorial on how to make your own Cerise Hood! (Yes, in addition to finally having a Sunday photo shoot, there will also be a Tuesday tutorial. I haven't completely abandoned you!)

2. I hate to be self-promotional, but I really need your help in the Doll Wardrobe photo contest. My entry is #3, and if you would just take a few seconds to vote for me I'd be extremely grateful. Since I don't like doing these sort of vote pleas (that's why I'm never going to run for government office, haha) I'm making a deal - if I win, I'll set up a giveaway here as a thank you for your help. Everyone benefits! Just click the photo below:


3. All right, this is the part of the miscellanea that's sad for me to type. Like I said earlier, I'm moving in less than a week to university, and as you can imagine I'll have much less time for dolls and blogging once the school year starts again. (I'm also not keen on bringing my entire doll collection, limited as it is, and freaking my roommate out.) After a long talk with my dad, I decided that the best thing to do is to put Paper Doll World on hold. I don't want to give up on blogging altogether, and I do want to get the store fully running, but for this next semester at least blogging will have to take a backseat. I've been a fairly sporadic blogger this past semester, so while I would love to say that this has just been a rough patch and to expect more posts, that isn't true. I'll pop in from time to time, but (and I truly am sorry about this) don't expect regular posting. I will try to schedule as much as I can in the limited time I have, so we'll see about maintaining some level of blogging normalcy.

That's all for today, so thanks for reading, and I'll see you in a few days!

Sunday, August 3, 2014

Surprise Again!

Well, my final surprise is out, and though you've probably seen it I'm going to post about it anyway because I still can't believe that it actually happened. I'm not quite sure how to properly share this without sounding boastful and arrogant, so I'm just going to stick this screencap here:


I've got a guest post up on The Toy Box Philosopher! It's been four days and I'm still over the moon. 

As you know, I have a thing for commemorating special occasions with Ellowyne Wilde, and have fallen for "Flora, Fauna, and not so Merryweather" ever since she was released as the January convention exclusive. So when I saw that Wilde Imagination had marked her down and threw in a deal for 25% off plus free shipping, I thought she'd make the perfect graduation gift to myself. So I snapped her up just before she sold out, and when she arrived in mid-June I was so in love with this Ellowyne that I asked Emily of The Toy Box Philosopher if I could send in a guest review. As you can tell from the fact that I'm writing this post, she graciously agreed. 

It was a wonderful experience, and I am so overwhelmed by the fact that I was lucky enough to have it.  In my emails to her I couldn't stop thanking her for the opportunity; not only is Emily a really fantastic person, it really enhanced my enjoyment of this new Ellowyne. Now whenever I look at the doll I think about the fantastic time I had putting together the review, and that makes me adore her even more. 

Some of my favorite photos of the new Ellowyne Wilde doll, who I've renamed Florence Ophelia Wilde (as you can see, I stuck with the trend of giving my Ellowyne dolls Shakespearean names):


I really wanted to get a picture of Ophelia leaning over the bridge, but the scale was all wrong and I was petrified of dropping my new doll into the river, so I settled for this instead. It turned out nicely, though, so all's well that ends well. 


This is one of my very favorites, though I had to rush to get the pictures taken because this area was a mosquito haven. Lucky for Ophelia that mosquitos don't care for plastic. 


I wish I had a photo of myself taking this photo to show you how crazy it looked. I was in front of my house contorted like a Cirque de Soleil acrobat so I could be at just the right angle for the photo, holding out Ophelia at arm's length with my phone in the other hand and her jacket in my lap, and just as I was trying to position Ophelia just right to take the photo, my neighbor drove by and gave me the strangest look. Oh well, at least the photo turned out nicely.


Just like Viola, Ophelia shines in the late afternoon sunlight. Both dolls have such beautiful hair that is so fun to photograph.


I would be remiss if I didn't include a picture of Ophelia with a few paper dolls, since this is Paper Doll World, after all.


Miniatures upon miniatures - these photos got somewhat meta, especially when my sister decided to help arrange the dolls (I didn't share those photos because of internet privacy, but suffice it to say that it was pretty cute), but to me it encapsulates my feeling that no matter what three-dimensional dolls end up on my shelf, my first priority will always be my paper dolls.


I'm going to close off with one of my top favorite photos:


 I love this photo so much - Viola and Ophelia are so different, yet both extraordinarily beautiful. The green tulle on Viola's dress and the olive shantung of Ophelia's jacket are very close matches for their eyes.

That's it for my surprises; I hope you enjoyed them as much as I did. I'll be back soon with, hopefully, some new paper ideas and a few 3D projects as well. Come back soon!

Thursday, July 31, 2014

3D Thursday #2 + Surprise!

You may have wondered about the radio silence lately (if anyone's still reading...), but at last I can finally reveal why I was MIA. Aside from the typical chaos of my everyday life offline, I've been tremendously busy with two special projects and I can finally reveal one of them!


The Doll Mag is celebrating its third birthday this month, and when I found out that the celebration theme was Secret Garden Party I couldn't not share a tutorial. Frances Hodgson Burnett's The Secret Garden was my favorite book when I was small (I was a strange little child, and the book inspired my lifelong interest in cholera and water treatment. Guess I've never outgrown being strange.), so of course I decided to create my own rose garden scaled down for paper dolls. Click the link to view the tutorial! I'm counting this as a 3D Thursday project because it technically fits the qualifications, even though it's cheating just the tiniest bit by being a guest post.

Some more photos of the garden party (like with many photo setups, I went a little photo crazy) :


Treehouse pictures are practically a staple here, so of course I had to include one in the garden. I think it's a tremendous improvement over the original treehouse.


Credit goes to my sister for styling the dolls - I was rushing to get the photos together for Bella and Lulu, so she took care of the outfits. I wouldn't have come up with Alia's outfit on my own, but it works, and of course there's no way to go wrong with Isabelle's cape. You know how I am when it comes to Sitara.


The lanterns really make this garden special, but for me the best part is the table and food. I didn't want to go full-on with sweets, but this is a party so I tried to create a balance between treats and cookout food. I was originally just going to use a pizza table and cover it with a tablecloth, but this picnic table turned out so well that I couldn't bring myself to cover up the nice wood grain pattern. 


While the Doll Mag is primarily focused on the 18" American Girl dolls, I couldn't resist sneaking Sad Sally into the scene. She doesn't seem to be too sad about gatecrashing the party.


 A look at the lanterns, my second-favorite part of the scene...


and the flower bushes. I used maybe eight shades of pink on each bud, but it was worth it.


Hope you enjoyed the tutorial! If you make your own, please send me a photo; I would love to see it. Come back soon for the second reveal, and happy birthday again to the Doll Mag!

Thursday, July 17, 2014

3D Thursday #1

One of the primary lesson I've learned in sewing is - shocker - to always start with a pattern. (Before all you experienced seamstresses start laughing at me, some people can sew perfectly well by estimating and eyeballing, but for me that just ends up with a lot of wasted time and fabric.) For this dress I made my own bodice pattern based on a Trio for Blythe tutorial, and adapted the skirt pattern from the free MHD sun dress pattern. Here's a look at my desk in the middle of this process. 


Below, the separate parts of the dress are sewn together, preferably with the skirt and bodice seams lined up. I only realized after I'd constructed most of the dress that my seams were a little off, and as befits a lazy sewing newbie, decided to just leave it be and try to cover it with embroidery. Don't make my mistake!


To decorate, embroider whatever patterns you like on the dress. I drew heavily from the floral designs on the Trio bodices, and also did it all freehand (see "lazy sewing newbie", above). This is the most fun part, in my opinion, so really go wild with designs and embellishments. I added some Czech glass beads for sparkle, but it's all up to you.


Don't forget to try it on your doll every so often to make sure that it fits properly.


Sew up the back up to an inch below the bottom of the bodice, and then close it however you like - with buttons, snaps, eyelets, Velcro. You can even get really fancy and make little thread loops on the back of the bodice to thread ribbon through. While that method looks really nice, it's too complicated for me so I just went with the eyelets (though I tried snaps and those worked well too). 

Thread loops. This dress is, once again, by Trio. 
Make a lining if you're interested, and you're done!


I hope you enjoyed this simple walkthrough. If you have any questions or suggestions, please let me know in the comments.

Wednesday, July 16, 2014

Duel Nature

I started this blog about a year and a half ago with the intention of sharing one of my favorite hobbies - making paper dolls and miniatures. It's been fun and exciting, but the thing about paper dolls is that they're simple. This is great for putting together a fun plaything or scene in a hurry, but the downside is that there's really not much to do in terms of tutorials because they all work the same way: come up with a design, draw it as a flat figure, cut it out and fold or glue together. There's only so many times that you can read or write the same basic steps without getting bored, and the last thing I want to do is bore you.

Also, a side effect of creating this blog is further segmentation of my life. I try to keep my personal life off the site for obvious reasons - you came here to read about paper dolls, not about my daily life, and also basic internet safety - but this separation further cements my feelings of having a dual personality. I don't want to have a "doll side" and a "regular side"; I want to be a person with many interests, and one of them is paper dolls, but due to the things I mentioned earlier that's going to be difficult to mange on this blog.

When I began this blog I had the intention of creating a persona similar to that of Agoverseasfan, who never reveals any personal information - we don't know anything at all about Agoverseasfan except  interest in dolls. For the reasons I previously stated I thought that would be the safest option, but the truth is that I'm miserable. I'm tired of trying to hide my liking of dolls in my everyday life, and I'm tired of not being able to talk here about the other things I enjoy. I just can't reconcile that with my idea that Paper Doll World is specifically for paper doll related posts.

Honestly, I wish I could emulate the blogging style of Beast'sbelle of Never Grow Up and Kristen Rosenau of Pastry Affair. Both are talented writers and photographers, and gracefully walk the line between internet privacy and sharing some of their life and thoughts about it (I particularly admire Beast'sbelle's confidence in taking doll photos in public, something I've always been too scared to try). Reading their blogs gives me the sense of communicating with a real person, not a cardboard cutout like I worry I've become.

I'm torn between wanting to keep all my blogging to Paper Doll World and setting up a separate blog for what happens on my side of the monitor. What are your thoughts, and how do you deal with balancing your online persona?

Wednesday, June 11, 2014

Dress Sneak Peek

Okay, I'll come clean: this is essentially Viola picspam. I can't help it - she's just such a beautiful doll! Even under harsh and dull lighting she's lovely, but in late afternoon sunlight she just shines. 

No filters need apply. 
A little bit about the dress: it's really simple, just one bodice piece and four skirt panels (I didn't line it for lack of fabric), and all straight stitching except for the bodice hem. The pattern calls for eight panels, and then gathers them when sewing them to the bodice, but I wanted a sleeker look so I left them off.


The bodice closes fully in the back, so you can use snaps, velcro, or buttons to do it up. I personally like the laced up look of a corset, so I sewed up the back of the bodice a little smaller and then put in eyelets. It was a bit of extra work (and more than a bit of extra expense - thank goodness for Joann's coupons!), but I'm happy with how it turned out.

Ostensibly a photo of the back closure, but let's be real - I can't get enough of Viola's gorgeous hair.
The best part of the dress for me is the embroidery. This was my first time freehand embroidering, and I had so much fun with it, though I still struggle with French knots. 


I can't wait to share the tutorial with you, and hope you enjoy it as much as I did. While I love making things for all my dolls (paper or otherwise), Viola is my especial muse, and it's such a pleasure to create with her in mind. I hope that, no matter who is the lucky recipient of your dress, you have a similar crafting experience.


Monday, June 9, 2014

Summer Series 2014 Big Reveal

Finally the supplies have been purchased, items photographed, and at last I can reveal the new project. Kudos to Cinnamon Swirl and Ashley A. for being closest to the mark regarding what the new project is!

You may recall that last year's summer project series featured Juliet, a paper Ellowyne doll, and involved several tutorials for summer related paper doll items.


This year I decided to do something similar, only with several alterations. This series is not restricted to summer themed projects - in fact, it's not even restricted to paper items. Like last year, Ellowyne Wilde is involved, but she's of a completely different sort altogether. 

I would like to present you with "3D Thursdays," featuring Miss Viola Blair Wilde.


Viola, "Behind Blue Eyes," was a fairly good eBay deal (a gift to myself for completing my senior thesis, which is a greatly simplified version of the process of getting a PhD) and just what I needed to break me out of my creative mental block. She arrived without clothes or accessories, and since I won't abide having a naked doll around (paper or otherwise), I began to explore the whole new world of fabrics and clothing patterns. In this new summer series, I'm going to share what I've learned about making three-dimensional doll items, and provide tutorials for making your own. The first will ideally be up this Thursday or the next, and in it I'll show you how I made the dress in the photo.

I say this both as a caution and as and encouragement: I'm no sewing guru. That dress is the third doll garment I've ever made. Don't expect any fancy sewing terms or tricks, but at the same time, if I (a complete beginner) could make doll clothes that are functional and not hideous, anyone can too. I look forward to sharing these tutorials with you, and seeing what you make with them!

Friday, June 6, 2014

Texture Teasers Part 4

At last, the final teaser post! This one is the most obvious, as well as my favorite aesthetically:


Hope this cleared things up for you somewhat. I can't wait to reveal the rest!

Related Posts Plugin for WordPress, Blogger...